Content available at:
How to benefit most from Van Gent Community nests Part 2 – The management
BIRD AND EQUIPMENT MANAGEMENT IN PRODUCTION
Have the slat height adjustable at 35 cm (1.15’) at the start of production and increase its height around 40 weeks of age when droppings are getting close to the slats. The increase of the slat height will then go to 45 cm (1.5’). This concept is only possible with a Van Gent (Vencomatic) community nest with rigid wooden slats setup.
Droppings should never touch the slats, whether wooden or plastic. Droppings coming through the slats will dirty the hens’ footpath, contaminate the nest pads, and hatching eggs, negatively affecting the broiler chicks.
Place a maximum of 2 cm (<1”) of litter height on the concrete floor and have this litter only placed against the wall. This facilitates the forklifts to move over the concrete floor. The birds will distribute the litter over the whole scratch (floor) area the next day.
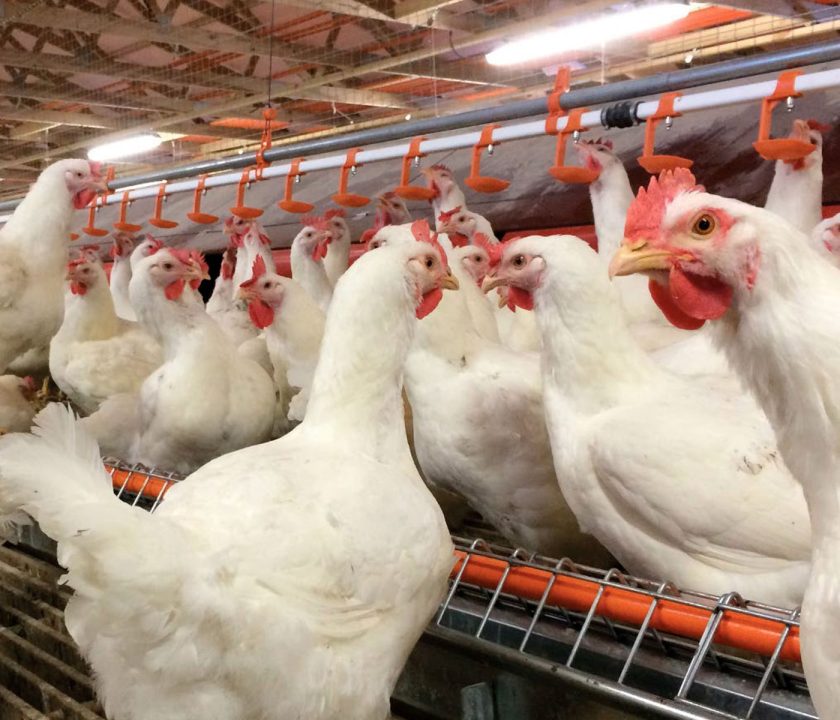
Always keep the litter as low as possible, even after peak production. The best place for the hens to lay their eggs must be in the community nests. At move, birds are dropped in the scratch area but should soon go up on the slats (jumping mobility created in the rearing period).
If some females or males do not go on the slats after 1 day, help them go up.
Feed distribution is done in the dark before the lights come on in the early morning. The dark-out period depends on the minutes it takes for the feed to go around. Once the feed is around, the chain stops, and the lights come on. More towards peak production, if needed, the chain is activated again after 10 minutes and runs till all the feed is gone.
Whatever the width of the house, 12 m (40’) or 14 m (46’), feeder loops or lines should have a winch system for tractors and forklifts to drive inside during delivery of birds and at cleanout. Besides this, one can have legs for the feeding system in the scratch area and place the feeder lines directly on the slats in a bracket. The winched system is used until peak production for the feeder lines in the scratch area but on the slats the feeding system stays in the brackets.
- If floor and slat feeder lines are winched up as standard procedure during the whole production period, they must have a highprofile grill system, so birds cannot perch adding extra weight to the pulley system. Having the feeding system directly on the slats and not winched up in the scratch area avoids problems of the system falling down and creating significant issues in repair and stress for birds, besides potentially losing some egg production.
Males are being fed after the females start consuming their feed. The male feeding system is winched up after males finish feeding; intake is filled immediately in the air and checked for proper pan feed distribution daily. A new male feeding system is a chain or belt-type trough against the wall, giving more available floor space to the flock. Filling is done after the females eat.
In the first weeks after the move, put the birds to bed in the late afternoon by walking the floor and pushing them up the slats. Some tips:
- The faster the birds (males and females) go up the slats after moving, the lower the floor eggs at the start of
production. - It will also mean that males and females have found the nipple or drinker lines, so there are no issues with dehydrated birds.
- The best thing is that most females sleep on the slats if slat size permits.
Walk daily along the side walls to push birds towards the slat area.
- Floor eggs produced against the side walls are the most persistent, and hens are difficult to correct once accustomed to lay there.
- Start floor walking more frequently once the first eggs are seen.
Keep the nests closed till 1st eggs are seen (with Van Gent nest). This concept is used when the expel system in the nest is a grill, and hens can stick their heads inside when nests are closed to explore a place to lay their eggs. Birds are inquisitive when changes happen in the house. Do not open the nest system after a move or before there is any egg production.
Watch the low litter quality. Ventilation must work well to keep the litter in good dry condition (tunnel curtain opening must be correct).
- Having a good synchronization between the sexes and having active males helps push the females on the slats, resulting in fewer floor eggs.
- In 1st week of production, run the egg belt only in the afternoon. In the second production week, determine the times you want to collect the hatching eggs.
The small plastic flaps that separate the egg belt from the nest area need to shield the eggs on the belt from the birds and avoid hens seeing the belt moving.
- If hatching eggs (HE) are only collected with an egg collection table at the front of the house, the collection can be done several times daily, especially in the summer.
- If using an egg packer, determine when to start it 6 to 7 hours after the lights come on and run it constantly until all the houses are done.
- The Van Gent egg belt system permits accumulating the daily production on the belts, and this is used more in solidside production houses with normal temperatures or dependent on the environment.
- The more the egg packer is activated and deactivated daily, the more wear will happen on the system.
Do not walk alongside the nest system in production in the morning when most activity is going on with hens entering and leaving the nest system. Walking and checking the nests should be done only in the afternoon when few hens are in the nests.

Open the nests 1 hour before the lights come on in the first weeks of production and then increase to 2 or 3 hours close to peak production so early birds can go inside if a night light (blue) is present.
Close the nests 11 hours after the lights come on, and after 33 weeks, increase this to 12 hours or more, depending on egg-laying behavior. With natural light coming into the houses, the total hours of light can go towards 15-16 hours in the summer months, depending on the latitude. In those situations, there is no need to keep the nest open for this long, and after 12 hours, more or less, the expel system should close the nest.
Normally, >90% of the total daily egg production is produced in the first 8 hours after the lights come on but check this for the different breeds used.
- There is a difference between breeds and overtime in production more egg laying shifts towards the afternoon.
- In solid-side production houses, the light program can start early, at 4 a.m.; by noon, most eggs will be on the egg belts.
- Closing the nests on time to avoid hens dirtying the nest pads in the afternoon and should improve egg /chick quality.
- In some situations, the nest pads are cleaned around 40 weeks of age, depending on nest management.
Check constantly in the morning if the water (nipple) lines have the correct height and have the proper water flow. If water intake control is done, suspend it after the production has surpassed 50% going to peak production and only start back up after peak production at 32 weeks of age. Fast enough water intake after feeding is essential to avoid slat eggs and also avoid any water availability issues going to peak production. Water shortage going to peak, will affect egg production potential.
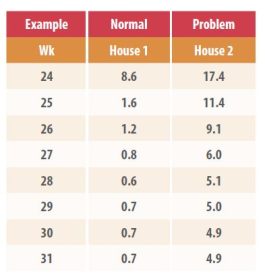
The table annexed is a floor egg example of a normal and a problem house every week from start to peak production.
- In a 4-week period, the typical house drops to below 1% floor eggs while the problem house comes down from 17% to 6% and then stays in the upper 4% range in peak production and beyond. This last situation is unacceptable and often requires more manpower hours to pick up the eggs.

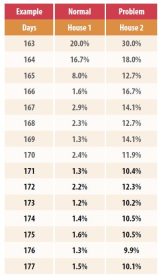
During the first week of the production, the floor egg % should ideally be below 20% and then come down very fast daily, even with the production going up fast. The first hens must go into the nests, indicating to the other hens coming in production where to lay the eggs and not show them slat or floor eggs.
Table 2 shows that in 4 days, a house drops from 20% to 1.6% floor eggs in a good situation, but it stays too high in a problem-case house. When floor eggs come down too slowly and stay too high, then clearly, some of the females are not inclined to use the nests. It can be lazy females, inadequate training, or management of deficient nests that birds do not like.


IN SUMMARY:
- House set-up is crucial in reducing out-of-nest eggs to a minimum, especially when using higher bird densities.
- The right type of nest is essential to attract the females.
- Out-of-nest eggs are the weakest spot for the community nest, and the objective is to have less than 1% in peak production.
- There needs to be a proper balance between the slat and floor area for maximum production, hatching egg numbers, and fertility.
There are situations in which some of the hens will not come off the slats, thus lowering fertility rates, especially with overly aggressive males and when hens lose a lot of back feathers. Balance the sexual maturity between the sexes. Females should not be afraid to go on the floor area.
- Adding scratch grain or oyster shells in the litter in the afternoon is an effective way to get the females off the slats and into the scratch area, avoid excessive males, and observe matings.
It is good to involve the breeder companies in all new housing projects or at least get their opinion. Many times, new houses are shown after construction is complete and equipment is purchased. Mistakes can be very costly and often cannot be changed easily.