
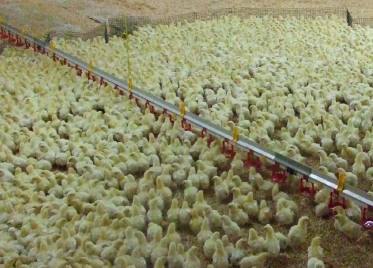

The importance of the brooding period cannot be over emphasized. The first 14 days of a chick’s life sets the precedent for good performance. Extra effort during the brooding phase will be rewarded in the final flock performance. The goal of the brooding chamber design and management is to increase the size of the brooding area as quickly as possible, while maintaining the correct house temperature. Here are some key points from pre-placement to turn out that will help get chicks off to a good start.
Pre-Placement Equipment Checks
The key to successful rearing lies in an effective management program starting with chick placement. Prior to chick placement, the equipment and facilities must be prepared to receive the chicks. Check all equipment at least 48 hours prior to chick placement. Activate heaters and ensure the environment and temperatures are optimized for chicks.
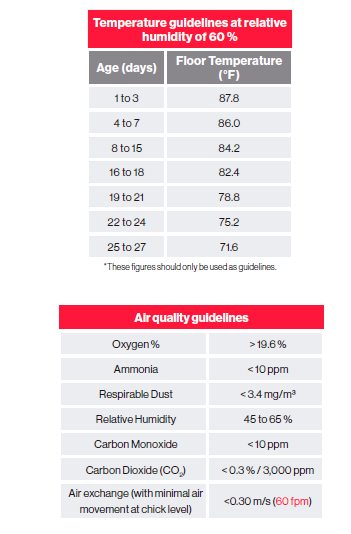
Minimum ventilation: Activate as soon as pre-heating begins to remove waste gases and excess moisture. Ensure the house is well sealed. Check that CO2 levels are below 3,000 ppm. Use stir fans to help distribute heat and gain uniform floor/air temperatures. Turn on fans when the heaters are started.
Ambient Temperature: Temperature sensation is affected by temperature transfer and relative humidity of the air. If air is dry with low RH % transfer is low and higher dry bulb temperatures should be used as illustrated in the table to the right. Temperature at placement should be between 86 and 93 F depending on relative humidity.
Heaters: Verify that all heaters are installed at the recommended height and are operating at maximum output.
Floor Temperature: Preheating should begin at least 48 hours before chick placement. Concrete temperature (below litter) should be 82.4 to 86.0 °F and never exceed 90 °F. Floor temperatures should be 86 to 90 ⁰F at least 3 ft from the center of the radiant heater or brooder stove. Above 32 °C (90 ⁰F ) feed intake decreases, and at 35 °C (95 °F) stops altogether. The temperature differences between the front and back of the brooding area at chick level should not exceed 0.36 ºF. Chicks from smaller eggs (younger breeder flocks) require higher brooding temperatures because they produce less metabolic heat.


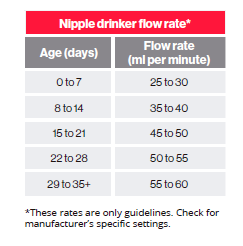
Drinkers: For partial house brooding, allow 40 chicks per nipple. When the house is fully opened, allow 8 to 10 birds per nipple. Ensure that nipple drinkers are at the chicks’ eye level at reception. Adjust lines after 2 days so the chicks’ necks are slightly stretched to drink. If needed, supply 1 supplementary drinker (1 gal) per 100 chicks. Supplemental drinkers should be placed slightly higher than the litter to maintain water quality but not out of reach and placed close to the primary water source. Sanitize water lines between flocks. Flush and activate nipples prior to placement.
Feeders: Feeders should be adjusted for chick height. Initially, feeders (pan and chain) should be at ground level so the chicks can easily access them. Calibrate the scales used to weigh the feed prior to the flock placement. Accurate weighing of feed is critical to prevent over or under feeding the flock. Ensure feed pans are on the correct setting.
Brooder Preparations
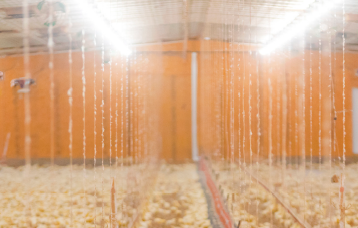
Brood chamber design
Brooder guards (paper, metal or wire partitions) should be carefully positioned to prevent chick entrapment and injury. Ideally, litter should be used to “seal” or fully cover the bottom of the brooder guard and stable partitions should be used to ensure the divider remains vertical. Keep lights on in the brood area to encourage chick activity, eating and drinking. Keep the lights off in the rest of the house.
Lighting
The intensity and distribution of light alters bird activity. Correct stimulation of activity with lighting during the first 5 to 7 days of age is necessary for optimal feed consumption, digestive and immune system development and good welfare. Light intensity should be 6 to 10 fc directly below the light and measured at chick height to enhance chick activity and encourage good early feed and water intake. Concentrating light around the nipple line will attract the chicks and improve early water and feed intake as they learn from each other. The darkest area in the brooder should not be below 3 fc.
Litter
Provide good, dry litter with ample depth (4 to 6 inch minimum) that is level across entire brood chamber. It is important that the litter material provide a soft, dry surface that conducts radiant heat. Level the bedding by raking and compressing firmly. Uneven litter creates uneven floor temperatures, causing groups of chicks to huddle in pockets or under equipment. Uneven litter can also result in unintended restricted access to feed and water at this critical time of development.
Supplementary feeders
Supplemental feeding equipment should not be placed directly under or too close to the brooders and feed should be distributed just prior to the chicks’ arrival. Provide one feeder tray for every 50 chicks at day old and ensure that supplementary feed remains fresh. Remove supplementary feeder trays after day 7.
Supplementary drinkers
If supplemental drinkers are necessary, open trays are not recommended since chicks may immerse themselves in these and / or contaminate the water with litter and feed which results in poor water quality. Supplemental drinkers should never be placed directly beneath the brooders as this will heat the water and it will become too warm to drink as well as increase water evaporation.
Stocking Density
Chicks from donor sources of a similar age should be placed together in the same pen (or house) upon arrival at the farm. Rearing these groups together will improve subsequent flock uniformity.
The placement density in the brooding chamber will depend on the size of the brooding area and the equipment. Initial stocking should not exceed more than 0.18 to 0.20 ft2 per bird. Ensure adequate drinking space, especially during summer placements – calculate 40 birds per nipple if nipples are easily activated.
Chick Placement
Chicks should be placed directly on the litter, close to feed and water. While placing chicks and checking during the brooding phase, staff should talk quitely and move calmly through the house to minimize stress.
After ensuring that all chicks are placed and comfortable, staff should leave chicks undisturbed for a minimum of 2 hours to allow them to acclimate to their new surroundings and rest.
Post-Placement Management
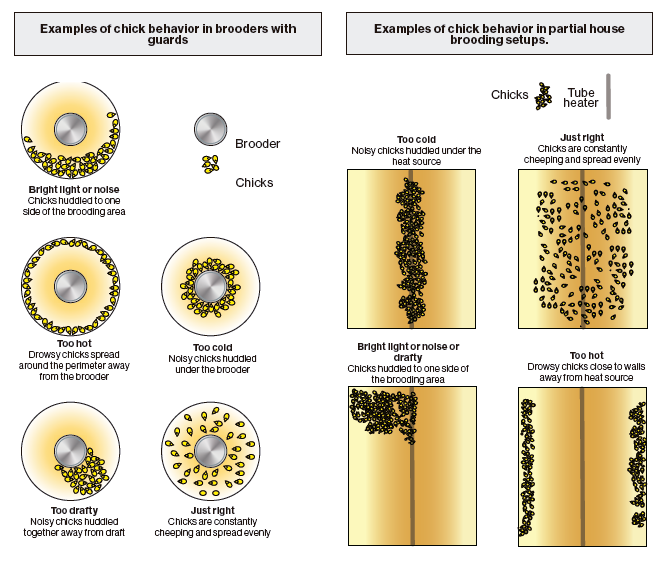
Check chicks 2 hours after placement which will give them time to settle and identify the reception area. Ensure they are comfortable. Chick distribution and behavior should be closely monitored after placement and within the first 24 to 48 hours of brooding. It is normal to see some chicks sleeping, eating or drinking, and some actively exploring their new environment. If you observe chicks panting, huddling, chirping loudly or irregularly distributed within the brood area, investigate the cause(s) immediately. If not corrected, they can have a negative impact on flock welfare and performance outcomes.
Temperature and Ventilation
Cold chicks will huddle with reduced activity, causing reduced feed and water intake and therefore reduced growth rate. If they are comfortably warm, the chicks should be evenly and actively moving around the brooding area.
Chick internal temperature can be measured using a small rectal probe thermometer with a soft tip. Quick-reading, digital thermometers are recommended for these chick checks. Hatched chick internal temperature should be 104 to 105 °F. Chick internal temperature above 106 °F in first 4 days can lead to panting. Chick internal temperature below 104 °F indicates that the chick is too cold.
Check ventilation settings and ensure there are no drafts or cold air movement at chick level. High quality air and low dust is also important for a good start in brooding.
Hydration and water management
The yolk contains 1 to 2 g of moisture so the chick will lose weight but not become dehydrated. If chicks start panting, they can lose 5 to 10 g of moisture in the first 24 hours and then dehydration will occur. Higher relative humidity will reduce moisture loss but also impair heat loss, so correct brood temperature is vital.
The supplemental drinkers should never be allowed to become completely empty (dry). Drinkers must be cleaned and refilled as necessary. Maintain maximum water levels in the supplemental drinkers until chicks are large enough to create spillage. Supplemental drinkers should be removed approximately 48 hours after placement. Water spillage and waste should be kept to a minimum especially during cold seasons because of lower air exchange to eliminate moisture during these months.
Ideal water temperature is between 50 and 57 °F, however birds can tolerate a wide range of water temperature; even so water temperature should never be greater than 77 °F. If this occurs the drinking system must be flushed at least 3 times per day.
Lighting
Provide a minimum of 3 fc in the darkest area of the house. Turn on all lights to provide even light distribution. Give chicks 23 hours of light at placement and 1 hour of darkness. Acclimate chicks to the dark by gradually reducing light duration to 8 hr by 14 day of age.
Check for light leaks inside and outside the brood area during pre-placement check to ensure light control will be achievable throughout rearing. This is crucial in both the brood and non-brood areas.
Feeder management and feed intake
The yolk contains 2/3 fat and 1/3 protein with the fat for energy and protein for growth. If early feed consumption doesn’t take place the chick will use both fat and protein in the yolk for energy, resulting in inadequate protein levels for growth. Early feed intake is crucial for chicks to sustain metabolic processes such as internal body temperature.
The main objective of management during the first hours after placement on the farm is to achieve as much intake of water and feed in as many chicks as possible. Failure to achieve this objective will lead to irreversible problems with flock performance including poor growth, poor feed conversion and poor flock uniformity.
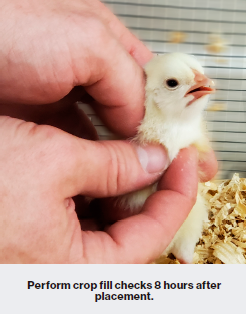
Sample 100 chicks per brooding area. If the crops of the chicks are checked 8 hours after placement a minimum of 85 % of examined chicks should have both feed and water present. A minimum of 95 % of the bird’s crops should be filled upon examination the morning after placement. If too many crops are hard (> 15 %), immediately evaluate water availability, water temperature, flow rate, etc. to determine why chicks may not be accessing water in the brood area.
If too many crops are soft (> 15 %), immediately evaluate feed availability, feed location, feed presentation (uniformity and smell), and verify that the correct feed was delivered to the farm. Check ambient temperature and floor temperature as well to determine why chicks may not be accessing feed in the brood area.
Opening the Brooders (Turning Out)
Generally, the rearing house partitions should be completely open after 14 to 16 days, but varies according to the final density capacity and the house structure conditions.
Heat and ventilate the unused area to the correct temperature at least 24 hours prior to expanding the brooding area. If the environment outside the brooding area is different, chicks may return to and remain in the brood area even after opening the entire house. Before opening the entire house, ensure that all environmental parameters (ventilation, floor temperature, humidity) are the same inside and outside the brood areas.
If supplemental drinker and / or feeder trays are used during brooding, they should be gradually removed from the brooding area over the period of several days before the house is completely opened. Check and activate the nipples on drinker lines that are outside of the brood area prior to turn out.
If chicks have been vaccinated for coccidiosis, transfer litter from the brooding area and mix it with the litter in the new space. This step is critical during the first 3 to 4 weeks so chicks continue ingesting the vaccine (oocysts) from the litter to complete the vaccine oocyst cycling needed for immunity.
Observe chick distribution and behavior as the brooding area is expanded and chicks are given more space. Chicks are naturally curious and will want to explore, but will still need to have the correct temperature, lighting and
ventilation to ensure they are comfortable, remain active, and can find feed and water easily within the expanded
area.
Conclusions
Extra focus on the brooding phase will ensure chicks have a good start and support future breeder performance. Begin preparing 48 hours before placement with heating and equipment checks. Prior to placement, perform detailed checks including feed and water availability. Post-placement, chick behavior is the best indicator of comfort or issues. When it is time to open the brooding area, make sure the area outside brooding is just as comfortable as inside.
Use the guidelines provided in this white paper to help support successful brooding. As always, our technical support team is always available to help.


Subscribe now to the poultry technical magazine
AUTHORS

Layer Longevity Starts at Rearing
H&N Technical Team
The Strategy for a Proper Infectious Bronchitis Control
Ceva Technical Team
Elevate Hatchery Performance with Petersime’s New Data-Driven Incubation Support Service
Petersime Technical Team
Maize and Soybean Meal Demand and Supply Situation in Indian Poultry Industry
Ricky Thaper
Production of Formed Injected Smoked Chicken Ham
Leonardo Ortiz Escoto
Antimicrobial Resistance in the Poultry Food Chain and Novel Strategies of Bacterial Control
Edgar O. Oviedo-Rondón
GREG TYLER INTERVIEW
Greg Tyler
Insights from the Inaugural US-RSPE Framework Report
Elena Myhre
Newcastle Disease: Knowing the Virus Better to Make the Best Control Decisions. Part II
Eliana Icochea D’Arrigo
Avian Pathogenic E. coli (APEC): Serotypes and Virulence
Cecilia Rosario Cortés
The Importance of Staff Training on Animal Welfare Issues in Poultry Industry
M. Verónica Jiménez Grez
Rodent Control is a Key Factor in Poultry Biosecurity and Sustainability
Edgar O. Oviedo-Rondón