To read more content about aviNews International March 2025
To read more content about aviNews International March 2025
Content available at:
INTRODUCTION
This technical document emphasizes the importance of first impressions in the poultry industry, particularly in evaluating chick quality at hatchery and farm arrival. It highlights the need for proper procedures and tools to assess chick quality, ensuring optimal incubation conditions and making necessary adjustments.
The article aims to guide hatchery and farm managers in evaluating chick quality, focusing on three main categories: preincubation, incubation, and post-incubation. The goal is to improve chick quality through careful assessment of each stage, including transport and holding conditions.
INCUBATION FACTORS IMPACTING ON CHICK QUALITY
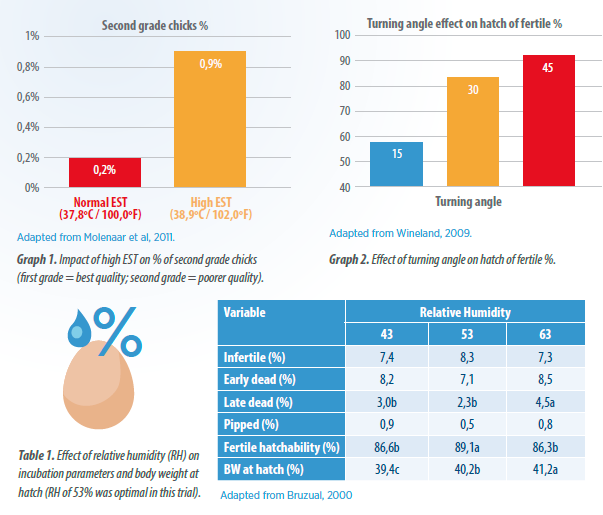
Temperature: eggshell temperature should be between 100-101°F (37.8-38.3°C) until hatch. Higher or lower than optimal EST will impact on hatchability, incubation time and chick quality (see graph 1). This is the most important incubation factor.
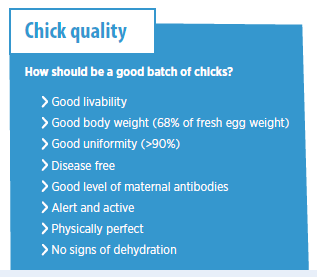
Humidity: setter humidity must be set to achieve an egg weight loss (EWL) between 11,5-13,5% at transfer (18,5 days of incubation). Suboptimal EWL impact on hatchability (increase of late dead), chick quality and 7-day livability. Low EWL could produce chicks with a large yolk sac which affect hatchability and increases the risk of bacterial contamination.
It is critical to have a standard procedure to check EWL on a regular basis.
Turning: angle and frequency. Turning failure, suboptimal frequency (more than 60 minutes per turning) or angle (< 38 degrees) have a big impact on hatchability (see graph 2) and chick quality due to a poor development of chorion allantoid membrane, yolk utilization and eggshell temperature uniformity. It is important to regularly check the turning frequency (every day) and turning angle (at least evert 6 months.)


Transfer: transferring hatching eggs from setter to hatcher must be done at the right day (best is 18-19 days of incubation) to maximize hatchability and chick quality. Handling of the eggs is critical to prevent eggshell cracks and must be done fast to prevent the eggs staying for too long at room temperature.
Hatching window: The hatching window is a result from preincubation and incubation factors. The optimal range is between 20 to 28 hours in multistage and less than 18 hours in single stage machines. A long window means that incubation conditions were not uniform (low EST or not uniform ESTs), egg storage was long, egg sizes were not uniform, different parent flock ages, among other factors. This impact on chick quality, chicks become dehydrated, and body weight uniformity. Everything must be done to achieve optimal hatching window.
Pull-out time: Chicks must be pulled out from the hatcher on the right time to prevent dehydration or too green chicks. Both conditions impact on chick livability.
POST-INCUBATION FACTORS IMPACTING ON CHICK QUALITY
1.During chicks processing
Evaluate the different areas during processing that can impact on chick quality. For example, chick counter, beak treatment, vaccine injection, sexing, among others.
2.Holding room and transportation of day-old chicks
Optimal temperature is 20 to 25°C with a relative humidity between 50 to 60%. Constant monitoring of these two parameters is essential and a data logger is the best option for an optimal evaluation.
Optimal ventilation allowing uniform temperature distribution, preventing chilling and overheating.
3.Brooding conditions
Temperature, feed, water, and ventilation are critical to achieve good 7-day livability. Incorrect temperature, wrong feed presentation or quality and lack of access to water will impact on chick quality and livability.
Evaluation of chick quality
Chicks behavior
At hatchery:
At farm:
There are qualitative, quantitative, semiquantitative and microbiology methods to precisely evaluate chick quality. Regardless of the method to is important to have a good representative sample and must be done after processing and selection.
Qualitative methods
Quantitative methods
Body weight and uniformity
Yolk free body mass (YFBM) and Residual yolk (RS)
Chick yield
Tona, Pasgar and Cervantes Scores
Chick Length
Other evaluation methods
Chick check (ask technical team for detailed information)
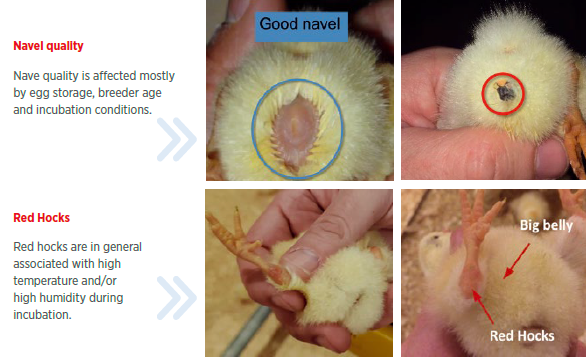
Big belly is associated with suboptimal incubation temperature and high humidity during incubation. It appears often associated with red hocks.
When too much meconium It is found on eggshells and hatcher trays means that chicks stayed for too long inside the hatchers. Corrective measures must be taken: adjust incubation hours, pull out earlier, evaluate egg shell temperature (maybe is too high) and check incubation humidity (maybe too low).


RECOMMENDED